|
|
Now that you know
about many of the tools you will need when working with clay in order to create
a finished ceramic piece, let’s talk about some of the techniques you can use
when wheel throwing.
The first technique you will need to learn when wheel throwing is centering. The first thing that you do at a potter’s wheel is to be sure that the clay you are working with is centered. Mastering this technique is a must but it can be very challenging and will require a lot of practice. Not only must you practice this technique until you are a master of the wheel but it is also extremely important to realize that your posture and the pressure that you apply to your clay along with hand-eye coordination will determine the finished product (Reason, 2010).
Throwing a cylinder is the second wheel throwing technique.
The first form every potter learns to throw is the cylinder—a form that is slightly taller than it is wide, and about as wide at the rim as it is at the base. Its walls and base form an angle of about 90 degrees. Beginners often find that making bowls comes more easily than making cylinders because the centrifugal force of a quick-spinning wheel naturally pulls clay outward, resulting in an open form rather than a narrow one. But first you’ll learn how to resist centrifugal force rather than submit to it. (Reason, 2010, p. 29)
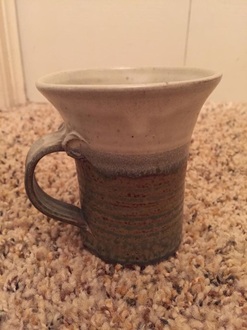
Once
you start throwing mugs you will have to learn how to pull a handle. Pulling a handle is a technique all its
own. It is neither a wheel throwing
technique nor a slab building technique.
To pull a handle you will need a bucket of water and a ball of
clay. Wet your hands and the clay and
begin pulling or stretching the clay into a long slender strip or until it is
the size and length that you want for your mug, pitcher, etc. Once you have gotten the clay to this point
you will need to decide the actually length you want the clay to be and then cut
it using a needle tool or an X-Acto knife.
Once the clay is cut you will need to use a needle tool to score the
edges or ends of the two pieces that will be joining—the ends of the handle and
the mug in order to attach the handle to the mug. After that the clay item is complete until it
is fired.
Another wheel throwing technique is throwing a bowl.
Another wheel throwing technique is throwing a bowl.
Simply put, a bowl is a form that is wider at its rim than it is at its foot. Its walls generally rise out of the base as a continuous and uninterrupted curve. Unlike a cylinder, the walls of a bowl aren’t usually thrown to a uniform thickness; walls that are thicker near the base help to support the bowl’s curve so that it doesn’t collapse as you throw it. After the thrown piece has dried a bit, the excess clay at the bottom is trimmed to form a foot ring. (Reason, 2010, p. 54)

|

|
Trimming
is a technique that is done when the clay is at its leather-hard stage and when
the clay is cut away from the bottom of the pot, in order to create a thinner
foot ring. The trimming or cutting away of
the walls and bottom of the pot is done while the pot spins around on the wheel. During this process the clay beings to take
form, which reveals what the finished product is intended to look like. The
foot ring is the base of the pot and the decision to have a foot ring begins in
the mind of the potter before starting because a little more clay will be
needed. The foot ring will be thinner
than the pot and will create a nice finish (Reason, 2010).
The last wheel throwing technique is called throwing off the hump. This process is done by removing from one large lump of wedged clay several small pieces, one after another. This technique is used to create many small items, such as lids, tiny pots and spouts. Since these items are normally made using small amounts of clay, they are usually hard to center but now this process makes it easier to center them more effectively on the wheel (Reason, 2010).
A technique that does not include wheel throwing or slab building is called pinch pots. A pinch pot is formed in the palm of the hand where a small ball of clay fits and the thumb is then pressed into the center, half-way to the bottom. The ball is pressed out evenly against the walls using the thumb and at the same time using the fingers on the outside to help with the process, while revolving the ball in the hand. Once the pot is ready it will need to be smoothed with a damp sponge. Pots made by the Native Americans were made in a similar way as the pinch pot technique, of course without a sponge (Lakeside Pottery, 2015).
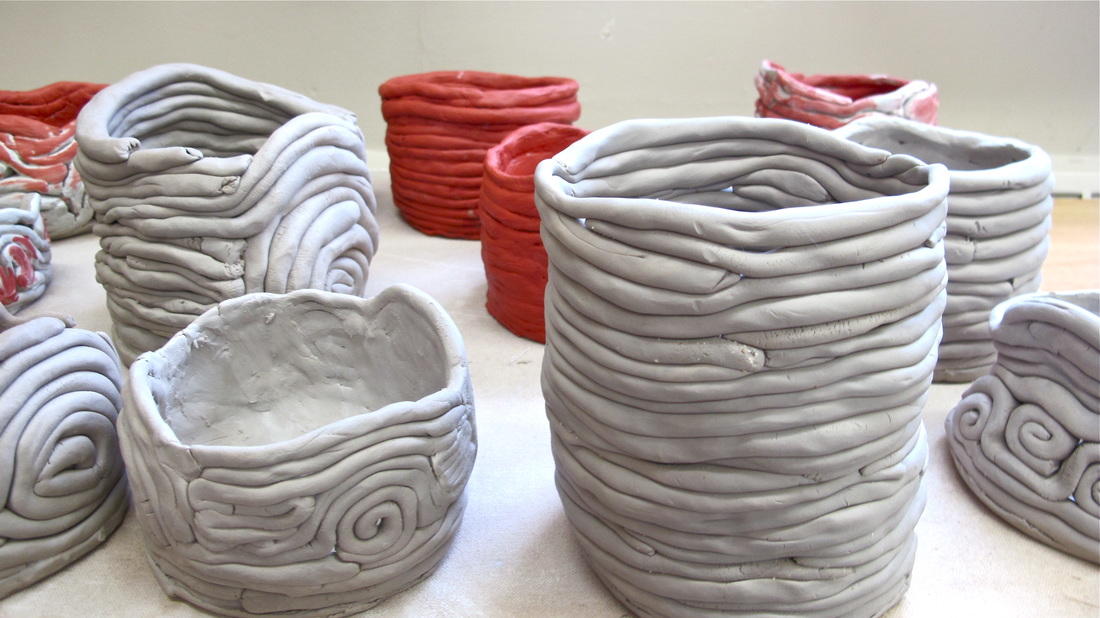
The Coil Method is another technique that does not include wheel throwing or slab building. Coils of clay are formed by shaping the clay into sausage like shapes while keeping the fingers flat. The sausage like shapes are rolled into ¼ to ½ inch thick ropes. After using the pinch pot method to make a shallow dish, turn it up-side-down. This will serve as a base for the foot. Along the edge of the foot a coil of clay is to be placed. With your fingers damp, join the rope like coil to the base using a little pressure. Continue adding coils of clay ropes. To give your creation an interesting texture, the coils can be pressed with the fingers or by using a tool or by simply using both fingers and a tool (Lakeside Pottery, 2015). The creation is up to the artist, as well as the many possibilities and movements of the hands.
The last wheel throwing technique is called throwing off the hump. This process is done by removing from one large lump of wedged clay several small pieces, one after another. This technique is used to create many small items, such as lids, tiny pots and spouts. Since these items are normally made using small amounts of clay, they are usually hard to center but now this process makes it easier to center them more effectively on the wheel (Reason, 2010).
A technique that does not include wheel throwing or slab building is called pinch pots. A pinch pot is formed in the palm of the hand where a small ball of clay fits and the thumb is then pressed into the center, half-way to the bottom. The ball is pressed out evenly against the walls using the thumb and at the same time using the fingers on the outside to help with the process, while revolving the ball in the hand. Once the pot is ready it will need to be smoothed with a damp sponge. Pots made by the Native Americans were made in a similar way as the pinch pot technique, of course without a sponge (Lakeside Pottery, 2015).
The Coil Method is another technique that does not include wheel throwing or slab building. Coils of clay are formed by shaping the clay into sausage like shapes while keeping the fingers flat. The sausage like shapes are rolled into ¼ to ½ inch thick ropes. After using the pinch pot method to make a shallow dish, turn it up-side-down. This will serve as a base for the foot. Along the edge of the foot a coil of clay is to be placed. With your fingers damp, join the rope like coil to the base using a little pressure. Continue adding coils of clay ropes. To give your creation an interesting texture, the coils can be pressed with the fingers or by using a tool or by simply using both fingers and a tool (Lakeside Pottery, 2015). The creation is up to the artist, as well as the many possibilities and movements of the hands.
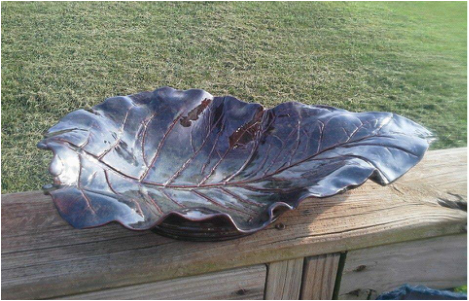
Now,
last but not the lease of these is the Slab Method. The slab building method is perfect for making
bird houses, masks, leaf bowls, baskets, tiles, and so much more.

|
|
When using the slab roller, place two strips of wood on canvas a little further apart than the width of the finished slabs. Working on a textured fabric will leave imprints on the clay slab. Place clay on the cloth between the strips of wood and roll out. Use a pointed tool to trim the slab of clay to desired size. You may make paper patterns to follow if a form that has a number of sides is desired. Rub a wet finger over the edges to be joined and score with a tool. Roll out a thin coil of sticky clay and place it along one edge. Press the two edges together. Slabs of clay may be placed over rocks, bowls, plastic forms, etc. to create interesting shapes. As the clay dries it shrinks away from the form, but retains the shape of the form. (Lakeside Pottery, 2015, para. 3)

|

|
Once
you are finished making your ceramic object, it is time to decorate the surface
of your object if desired.
Decorating surfaces is the next technique. The surface of an unfired pot that is either at its leather hard stage or bone-dry stage can be used as a place for potters to express themselves by using tools and brushes to create beautiful marks, detailed paintings, and carvings (Reason, 2010). Once your pot is bone-dry and you are done decorating the surface it is ready to be bisque fired. In order to be able to facilitate handling for the process of glazing and to keep the glazed pottery from exploding in the kiln, greenware is bisque-fired to red heat, which is 1500˚F (815˚C) (Peterson, 2004). If the pot has colorful paintings or carvings on it that the potter does not want covered up then the potter should use a clear glaze over it. A thick layer of clear glaze on the pot will create several small cracks in the glaze during the final firing, which will give your pot an antique look.
After bisque-firing is complete with your ceramic object it is time to begin the glazing process. Before the glaze is applied to your pot you will need to put wax on the bottom or foot of your pot using a brush. This will prevent glaze from sticking to the area and ultimately from sticking to the Kiln during the final firing which can cause damage to your pot.
There are two ways you can apply glaze to your ceramic object. You can either dip your pot into the glaze bucket or you can use a spray booth. Before dipping your ceramic object into a bucket, make sure the bucket is filled with glaze. It is important to stir the glaze with a wooden paint stir stick or a hand blender. To acquire a smooth consistency for small amounts of slip or glaze a standard small hand blender will work well. The use of an electric drill with a paint-mixing attachment is used to mix larger amounts of slip or glaze, which works much better than the small hand blender (Reason, 2010). Once the glaze is mixed you can dip your pot or ceramic object into the bucket and place it on a wooden shelf to dry. Once the glaze is dry your ceramic object is ready for the final firing.
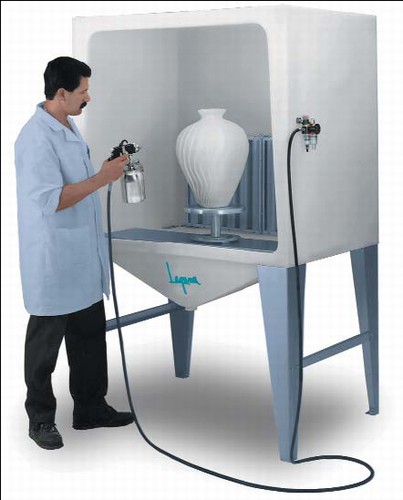
You can also apply glaze using a spray booth. Spray booths are enclosed areas that are usually shaped like a square or a box that is open on one side and has legs holding it up, just like the legs on a table. They are used in a studio to prevent glaze overspray from escaping into the room which can become a health hazard when breathed into the lungs (King, 1999). You will need a banding wheel inside the spray booth to set your pottery on and to turn your pot around on so that you can see all the sides of the pot while you spray glaze on it. You will also need a sieve and a spray gun with a removable screw on-bottle to put glaze inside of. The liquid glaze that you make will be smoother when it is poured through a sieve (Reason, 2010). So, when you pour glaze into the bottle that will be screwed onto the spray gun, you simply pour the glaze through the sieve and into the bottle. After that you screw the spray bottle onto the spray gun and you are ready to go. There are two types of spray guns that are used by ceramicists to spray glaze onto pieces before they are fired for the second and final time. One system is a spray gun that is used with a vacuum motor that sprays a high volume with low pressure. The other spray gun is used with a compressor (King, 1991).
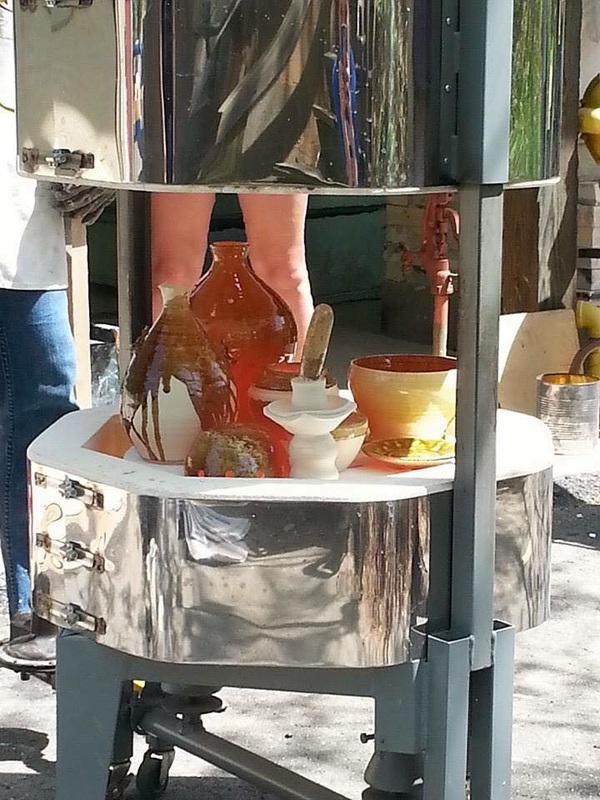
Once you have applied glaze it is time for the final firing. All firings, whether they are bisque firings or final firings are done using a Kiln. No matter what kind of Kiln you use you will need furniture for it. Kiln furniture consists of shelves, post, and other various accessories so that you can stack your ceramic pieces and fire more items at one time.
Decorating surfaces is the next technique. The surface of an unfired pot that is either at its leather hard stage or bone-dry stage can be used as a place for potters to express themselves by using tools and brushes to create beautiful marks, detailed paintings, and carvings (Reason, 2010). Once your pot is bone-dry and you are done decorating the surface it is ready to be bisque fired. In order to be able to facilitate handling for the process of glazing and to keep the glazed pottery from exploding in the kiln, greenware is bisque-fired to red heat, which is 1500˚F (815˚C) (Peterson, 2004). If the pot has colorful paintings or carvings on it that the potter does not want covered up then the potter should use a clear glaze over it. A thick layer of clear glaze on the pot will create several small cracks in the glaze during the final firing, which will give your pot an antique look.
After bisque-firing is complete with your ceramic object it is time to begin the glazing process. Before the glaze is applied to your pot you will need to put wax on the bottom or foot of your pot using a brush. This will prevent glaze from sticking to the area and ultimately from sticking to the Kiln during the final firing which can cause damage to your pot.
There are two ways you can apply glaze to your ceramic object. You can either dip your pot into the glaze bucket or you can use a spray booth. Before dipping your ceramic object into a bucket, make sure the bucket is filled with glaze. It is important to stir the glaze with a wooden paint stir stick or a hand blender. To acquire a smooth consistency for small amounts of slip or glaze a standard small hand blender will work well. The use of an electric drill with a paint-mixing attachment is used to mix larger amounts of slip or glaze, which works much better than the small hand blender (Reason, 2010). Once the glaze is mixed you can dip your pot or ceramic object into the bucket and place it on a wooden shelf to dry. Once the glaze is dry your ceramic object is ready for the final firing.
You can also apply glaze using a spray booth. Spray booths are enclosed areas that are usually shaped like a square or a box that is open on one side and has legs holding it up, just like the legs on a table. They are used in a studio to prevent glaze overspray from escaping into the room which can become a health hazard when breathed into the lungs (King, 1999). You will need a banding wheel inside the spray booth to set your pottery on and to turn your pot around on so that you can see all the sides of the pot while you spray glaze on it. You will also need a sieve and a spray gun with a removable screw on-bottle to put glaze inside of. The liquid glaze that you make will be smoother when it is poured through a sieve (Reason, 2010). So, when you pour glaze into the bottle that will be screwed onto the spray gun, you simply pour the glaze through the sieve and into the bottle. After that you screw the spray bottle onto the spray gun and you are ready to go. There are two types of spray guns that are used by ceramicists to spray glaze onto pieces before they are fired for the second and final time. One system is a spray gun that is used with a vacuum motor that sprays a high volume with low pressure. The other spray gun is used with a compressor (King, 1991).
Once you have applied glaze it is time for the final firing. All firings, whether they are bisque firings or final firings are done using a Kiln. No matter what kind of Kiln you use you will need furniture for it. Kiln furniture consists of shelves, post, and other various accessories so that you can stack your ceramic pieces and fire more items at one time.
|

|
A large car Kiln or shuttle Kiln, one that has shelves that slide out on a support, is ideal for architectural work. But it is possible to use smaller gas or electric Kilns, if you plan multiple firings of your sectioned pieces. (King, 1991, p. 21)

|

|
Even
though gas and electric Kilns are the most commonly used Kilns by ceramic
artist there is still one more type of Kiln worth mentioning called the Raku
Kiln.
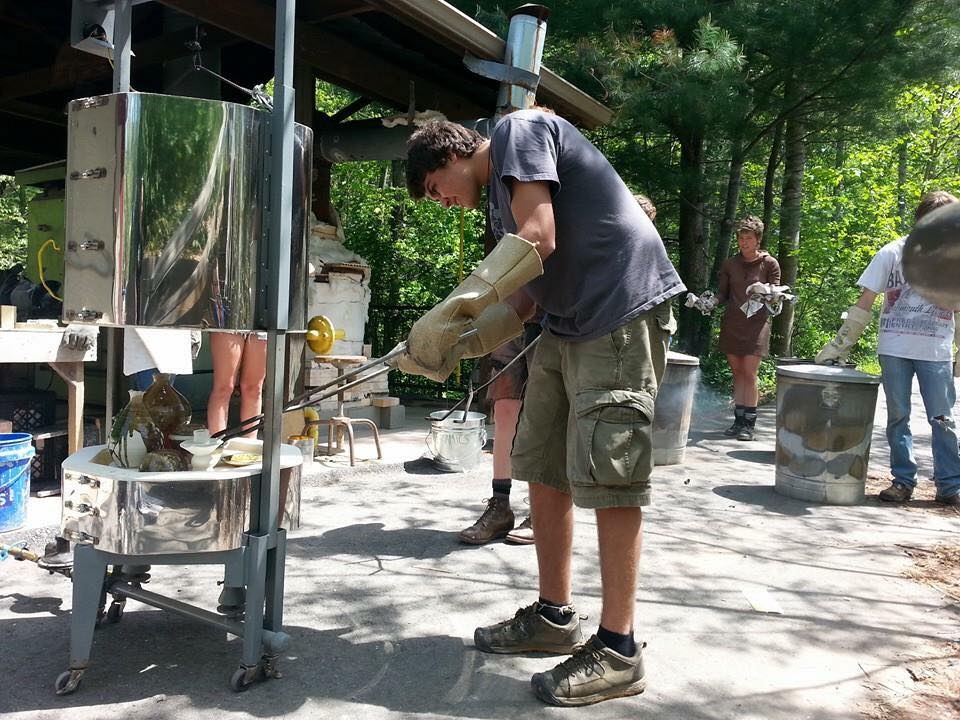
The Raku process has been enthusiastically adopted world-wide since its origination in japan in the latter part of the 16th Century. When rakuing clay, glazed or unglazed but preferably bisque is put into a hot (1800°F, 982°C) kiln for a few minutes. If it is glazed, a glassy surface shine like melting ice will appear. The work is pulled out hot, then smoked in a metal container of leaves, brush, pine needles, or similar, and finally quenched in cold water to stop the heat action. (Peterson, 2004, p. 235)
If
smoked in a metal container full of newspapers and magazines it will create a colorful
metallic look. No matter what kind of
Kiln you use, the final firing is the last step and after the final firing your
ceramic object is ready to be displayed or used.

|
|
For more information about ceramic techniques visit: http://www.lakesidepottery.com/HTML%20Text/Methods%20of%20Handbuilding.htm
